
SHOP
Basically yes, you can exchange it with your own yoke handle. If you have the technical knowledge and the talent ;-).
No.
For reasons of fairness towards all customers, we refrain from any discount campaigns.
We do not offer any trial period. Our high quality products are designed for flight simulation enthusiasts who want to enjoy the most realistic flight simulation experience. We offer 2 years warranty and a technical support. You will keep it anyway 😉
As we send our products to many countries worldwide, we suggest you check the fees in our online shop.
You can put the products in your cart and choose the region where you want it to be sent. You do not need to add any other information to get your shipping price.
It depends on your location and our stock.
In general you do not have to wait more than 21 days.
We accept all common means of payment such as Credit Cards as well as ApplePay or Samsung Pay.
You can check all available payment methods before checkout in the shop.
X-Plane | Prepar3d | MS FS 2020 | FSX | DCS | ProSim and as well Direct X interface is supported.
Because only CLS2SIM offers the required interface from our hardware to common simulation software.
PROFESSIONAL TRAINING
HELPDESK
TECHNICAL SUPPORT
- Can my Yoke be mounted on the desktop?
Visit the product page of your specific product to find a technical drawing showing the positions of any mounting holes.
https://www.brunner-innovation.swiss/produkt-uebersicht/ - Can I mount it inverted?
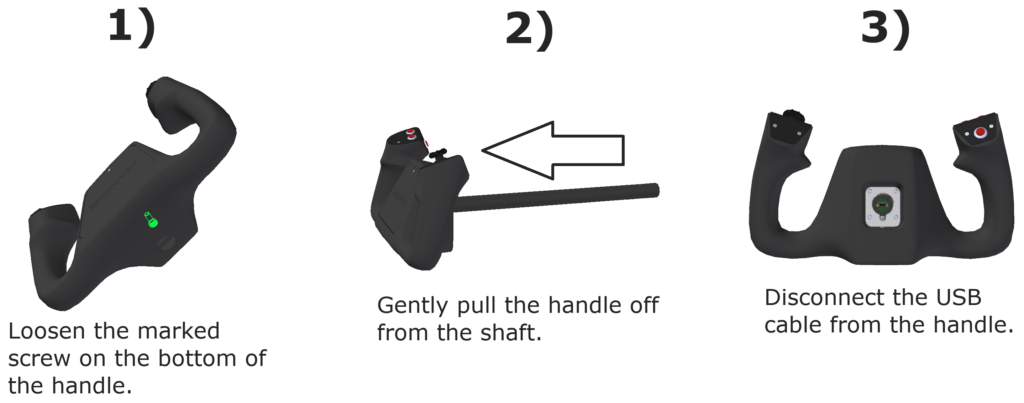
No, the yoke handle cannot be mounted inverted, so your handle would be upside down. - Can I temporarily remove the Yoke handle to push the elevator rod through a cover?
Yes, see instructions below.

Basically yes, you can exchange it with your own yoke handle. If you have the technical knowledge and the talent ;-).
Please follow these steps:
Note down the serial numbers of the problematic devices. Sticker on the back of the device, starts with GER.
Delete log file: C:\Program Files (x86)\Brunner Elektronik AG\CLS2Sim\Logs\logfile.log
Start CLS2Sim with debug argument: CLS2Sim.exe -debug
Reproduce problem
Close CLS2Sim
Send email to support@brunner-innovation.swiss or open a ticket containing the following information: C:\Program Files (x86)\Brunner Elektronik AG\CLS2Sim\Logs\logfile.log Serial numbers CLS2Sim version (see main window title bar) Precise description of problem and how to reproduce it.
CLS2Sim provides a few custom Datarefs to allow a very basic override of a few functions.
More sophisticated control requires use of the remote interface (TCP/UDP Network protocol, see here https://cls2sim.brunner-innovation.swiss/)
Abilities:
- Override when the hardware should activate its Autopilot mode (Stiff controls, moving to target pos).
- Override the Force scale factor, normally set by airspeed or static, with a custom value.
- Override how much the hydraulic has failed on the aircraft
- Enable/Disable rudder boost
Dataref: beh/autopilot_external_control
Datatype: Int
| Value | Description |
| 0 | CLS2Sim controls when AP on motorized axes is active. (Default behavior) |
| 1 | AP is OFF for Pitch + Roll + Yaw |
| 2 | AP is ON for Pitch + Roll and OFF for Yaw |
| 3 | AP is ON for Pitch + Roll + Yaw |
| 4 | AP is ON for Pitch + Roll and OFF for Yaw, position is set by sim/joystick/yoke_****_ratio datarefs.CLS2Sim AP setting "Don't set Pos in AP Mode" must be enabled. |
| 5 | AP is ON for Pitch + Roll + Yaw, position is set by sim/joystick/yoke_****_ratio datarefs.CLS2Sim AP setting "Don't set Pos in AP Mode" must be enabled. |
Dataref: beh/external_forcescalefactor_active
Datatype: Int
| Value | Description |
| 0 | CLS2Sim controls Force Scale Factor. (Default behavior) |
| 1 | Control Force Scale factor through beh/external_forcescalefactor_value dataref. |
Dataref: beh/external_forcescalefactor_value
Datatype: Int[4], [0] = Pitch, [1] = Roll, [2] = Yaw, [3] = Collective
Value: Directly set the Force Scale Factor value (Range 20 to 999)
Dataref: beh/use_custom_hydraulics_failure
Datatype: Int
| Value | Description |
| 0 | CLS2Sim controls Hydraulics failure. (Default behavior) |
| 1 | Control Hydraulics failure percentage through beh/custom_hydraulics_failure dataref. |
Dataref: beh/custom_hydraulics_failure
Datatype: Float
| Value | Description |
| 0.0 | Use normal scale factor value (CLS2Sim Hydraulics tab) |
| between 0 and 1 | Lerp between normal and failure scale factor values (CLS2Sim Hydraulics tab) |
| 1.0 | Use failure scale factor value (CLS2Sim Hydraulics tab) |
Dataref: beh/systems/rudderboost/active
Datatype: Int
| Value | Description |
| 0 | Off (Default) |
| 1 | On, if in CLS2Sim special rudder settings (Generic Tab), Rudder boost has been enabled. |
Backup
Perform the following steps for each Node ID of the device you want to back up:
Go to Custom Profiles and create a new Profile:
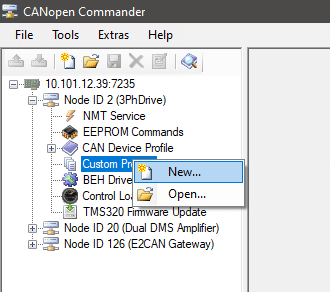
Enter a descriptive name that contains at least the Node ID. Copy the name into the clipboard, you'll need it later.
Check all objects.

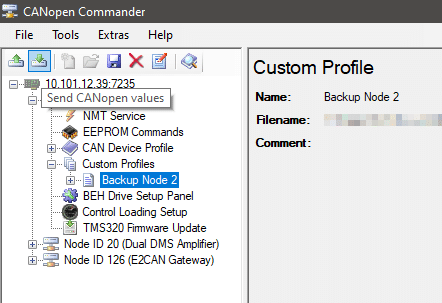
Select the newly created custom profile, then click on the top left button to read all CANopen values from the device into the file.
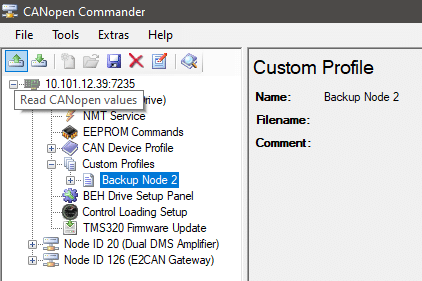
The status bar at the bottom will show the reading progress.

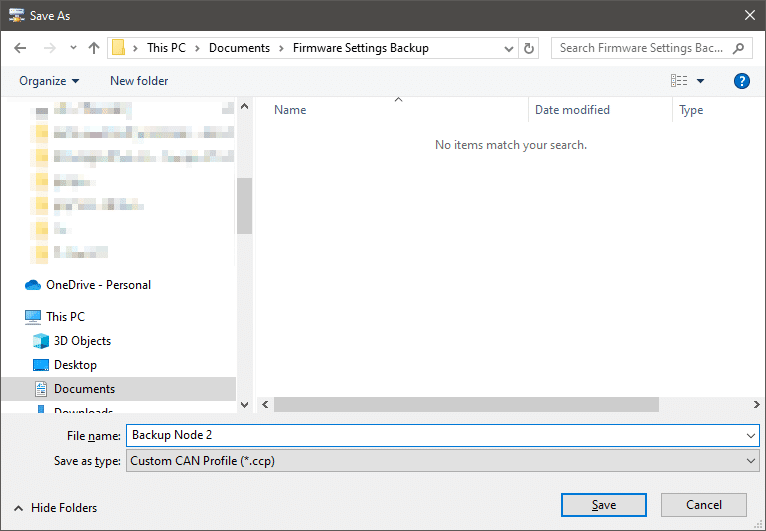
Now click the Save button at the top.
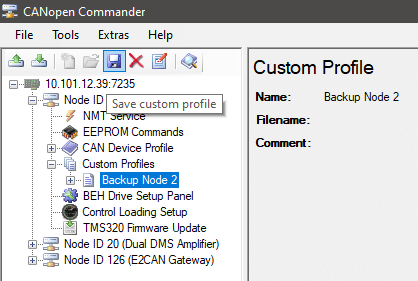
Enter a descriptive name containing the Node ID (Paste the copied name for the profile) and save the file.
Restore
Perform the following steps for each Node ID of the device you want to restore:
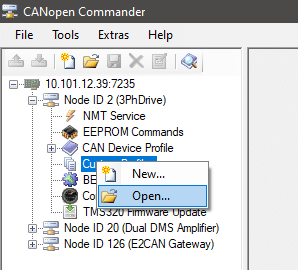
Go to Custom Profiles and open an existing Profile. Select the ccp file you have backed up previously:

Select the newly loaded profile and Write it down to the device:
Store all written settings to the devices EEPROM:

Once you have restored settings for all Node IDs, power-cycle all devices.
For X-Plane only, CLS2Sim allows mapping buttons, analog inputs or axes to any X-Plane dataref or command.
You can create additional custom actions, or you may even override the default behavior of CLS2Sim!
Tip: To watch/edit Datarefs or trigger commands in X-Plane you may use an X-Plane plugin like this one: https://datareftool.com/
Config Files
Open the following folder:
C:\Program Files (x86)\Brunner Elektronik AG\CLS2Sim\Settings\CustomActions
It contains 2 files:
- In the file
CustomActionsIDs.xmlyou may define custom digital or analog actions. - In the file
XPlaneCustomActionsConfig.xmlyou may change the existing actions or add custom actions.
How to define additional actions / override existing actions
Digital actions are triggered by buttons, analog actions can be trigged from analog inputs (eg. Rudder Pedal Brakes) or from axes (Joystick pitch axis).
You must define a custom action ID and name in CustomActionsIDs.xml for any additional action you wish to define.
- 12001 to 12999 is the valid ID range for custom digital actions.
- 13001 to 13999 is the valid ID range for custom analog actions.
The file XPlaneCustomActionsConfig.xml contains all definitions for X-Plane.
- You can add your own analog and digital actions.
- You can override the default actions.
To override the default actions, you need to know what ID corresponds to what action.
To get this information, start CLS2Sim.exe with the commandline argument -dumpactions
It will create a file in the same folder as CLS2Sim.exe named ACTION_IDS_DUMP.txt
There you can see that for example the ID 1 is the Elevator axis. Therefore changing the analog action definition for ID 1, you can make CLS2Sim write the elevator axis position to a custom dataref.
You can also create a new custom action. Define a custom ID and name in CustomActionsIDs.xml and then add a custom action definition to the end of XPlaneCustomActionsConfig.xml.
Here are the enum definitions for all the values, also the C# class definition behind the xml.
public enum DefinitionDataType
{
    INVALID = 0,
    INT = 1,
    FLOAT = 2,
    INT_ARRAY = 3,
    FLOAT_ARRAY = 4,
    BOOLEAN_ARRAY = 5,
    COMMAND = 6
}

public enum DefinitionRangeType
{
    INT_RANGE = 1,
    FLOAT_RANGE = 2,
    DEF_RANGE = 3,
    ONE_TO_ONE_RANGE = 4,
}

public enum DefinitionCondition
{
    ALWAYS = 0,
    ON_LOW = 1,
    ON_HIGH = 2,
    ON_DREF_LOW = 3,
    ON_DREF_HIGH = 4
}


public class XPlaneInputDefinition
{
    public XPlaneInputDefinition()
    {

    }

    public XPlaneInputDefinition(string defString, DefinitionDataType defDataType, int index)
    {
        DefinitionString = defString;
        DataType = defDataType;
        Index = index;

        StaticValue = false;
        ValueInt = 0;
        ValueFloat = 0;
        IsContinuous = false;
        CustomRange = false;
        Interval = 0;
        Condition = DefinitionCondition.ALWAYS;
        ConditionDefDataType = DefinitionDataType.INT;
        ConditionDataRef = "";
        ConditionDefIndex = 0;
        RangeType = DefinitionRangeType.INT_RANGE;
        LowerBoundInt = 0;
        UpperBoundInt = 1;
        LowerBoundFloat = 0;
        UpperBoundFloat = 1;
        LowerBoundDef = null;
        UpperBoundDef = null;
    }

    public XPlaneInputDefinition(string defString, DefinitionDataType defDataType)
    {
        DefinitionString = defString;
        DataType = defDataType;

        Index = -1;
        StaticValue = false;
        ValueInt = 0;
        ValueFloat = 0;
        IsContinuous = false;
        CustomRange = false;
        Interval = 0;
        Condition = DefinitionCondition.ALWAYS;
        ConditionDefDataType = DefinitionDataType.INT;
        ConditionDataRef = "";
        ConditionDefIndex = 0;
        RangeType = DefinitionRangeType.INT_RANGE;
        LowerBoundInt = 0;
        UpperBoundInt = 1;
        LowerBoundFloat = 0;
        UpperBoundFloat = 1;
        LowerBoundDef = null;
        UpperBoundDef = null;
    }

    public string DefinitionString { get; set; }

    public DefinitionDataType DataType { get; set; }

    public int Index { get; set; }

    public bool StaticValue { get; set; }

    public bool CustomValue { get; set; }

    public void SetStaticIntValue(int value)
    {
        ValueInt = value;
        StaticValue = true;
    }

    public void SetStaticFloatValue(float value)
    {
        ValueFloat = value;
        StaticValue = true;
    }

    public int ValueInt { get; set; }

    public float ValueFloat { get; set; }

    public int Interval { get; set; }

    public DefinitionCondition Condition { get; set; }

    public string ConditionDataRef { get; set; }

    public DefinitionDataType ConditionDefDataType { get; set; }

    public int ConditionDefIndex { get; set; }

    public bool IsContinuous { get; set; }

    public bool CustomRange { get; set; }

    public DefinitionRangeType RangeType { get; set; }

    public DefinitionDataType RangeDefDataType { get; set; }

    public int RangeDefIndex { get; set; }

    public int LowerBoundInt { get; set; }

    public int UpperBoundInt { get; set; }

    public float LowerBoundFloat { get; set; }

    public float UpperBoundFloat { get; set; }

    public string LowerBoundDef { get; set; }

    public string UpperBoundDef { get; set; }

    public void SetRangeInt(int low, int high)
    {
        RangeType = DefinitionRangeType.INT_RANGE;
        LowerBoundInt = low;
        UpperBoundInt = high;
    }

    public void SetRangeFloat(float low, float high)
    {
        RangeType = DefinitionRangeType.FLOAT_RANGE;
        LowerBoundFloat = low;
        UpperBoundFloat = high;
    }

    public void SetRangeDef(string low, string high, DefinitionDataType rangeDefDataType, int rangeDefIndex)
    {
        RangeType = DefinitionRangeType.DEF_RANGE;
        LowerBoundDef = low;
        UpperBoundDef = high;
        RangeDefDataType = rangeDefDataType;
        RangeDefIndex = rangeDefIndex;
    }
    public void SetRangeOneToOne()
    {
        RangeType = DefinitionRangeType.ONE_TO_ONE_RANGE;
    }
}
Important default actions to look at
The following default action will give an understanding how to use the system:
ACTION_AXIS_ELEVATOR (ID 1)
- Set the float dataref
sim/joystick/yoke_pitch_ratioto the axis value, scaled to an int range of -1 to 1 (the value itself stays as float, only the range borders are int) - Set the int dataref
sim/operation/override/override_joystick_pitchto the static int value 1 - Set the int dataref
sim/joystick/has_certified_pitchto the static int value 1
ACTION_AXIS_COLLECTIVE (ID 4)
- Set index 0 of the float array dataref sim/cockpit2/engine/actuators/prop_pitch_deg to the axis value, scaled to a range defined by the two datarefs
sim/aircraft/prop/acf_min_pitchandsim/aircraft/prop/acf_max_pitchwhich are also arrays, also reading index 0.
ACTION_DIGITAL_CONTACT_ATC (ID 1120)
- Trigger and hold the command
sim/operation/contact_atc(trigger it and release it only, when the input button goes low.)
ACTION_DIGITAL_CUT_ENGINE_1 (ID 9999)
- Set dataref sim/cockpit/engine/ignition_on to zero when button changes from released to pressed (rising flank only, no continous write)
Ensure that it is free of obstructions.
Further, follow these steps:
Note down the serial numbers of the problematic devices. Sticker on the back of the device, starts with GER.
Delete log file: C:\Program Files (x86)\Brunner Elektronik AG\CLS2Sim\Logs\logfile.log
Start CLS2Sim with debug argument: CLS2Sim.exe -debug
Reproduce problem
Close CLS2Sim
Send email to support@brunner-innovation.swiss or open a support ticket containing the following information: C:\Program Files (x86)\Brunner Elektronik AG\CLS2Sim\Logs\logfile.log Serial numbers CLS2Sim version (see main window title bar) Precise description of problem and how to reproduce it.
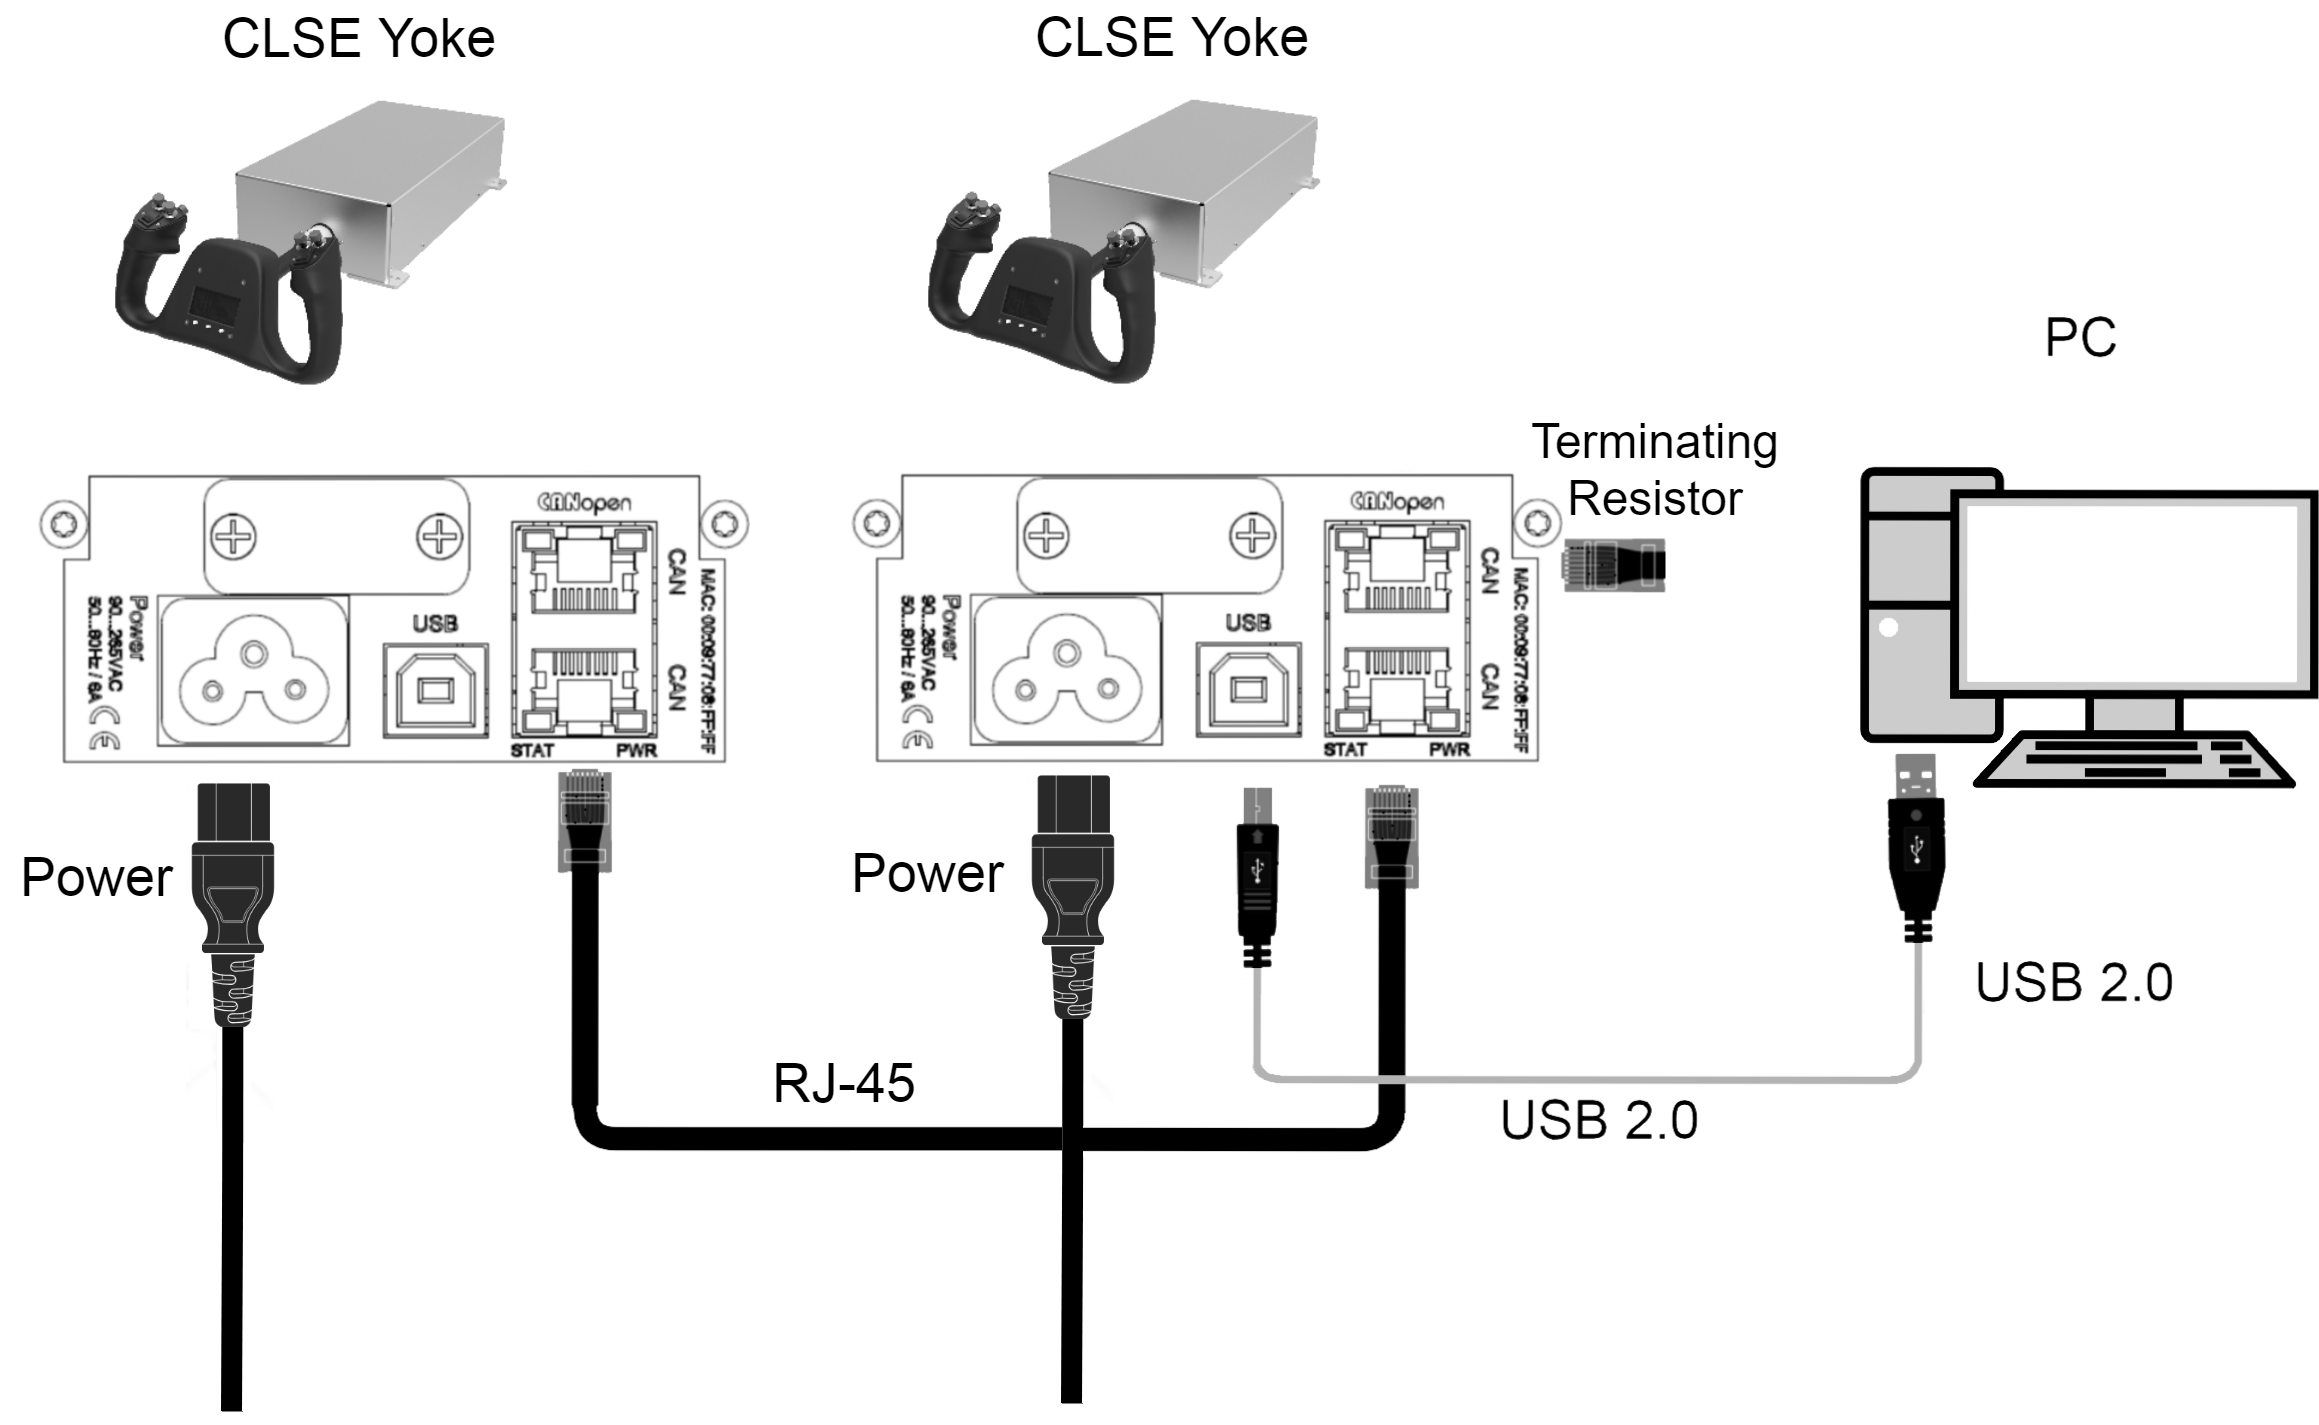
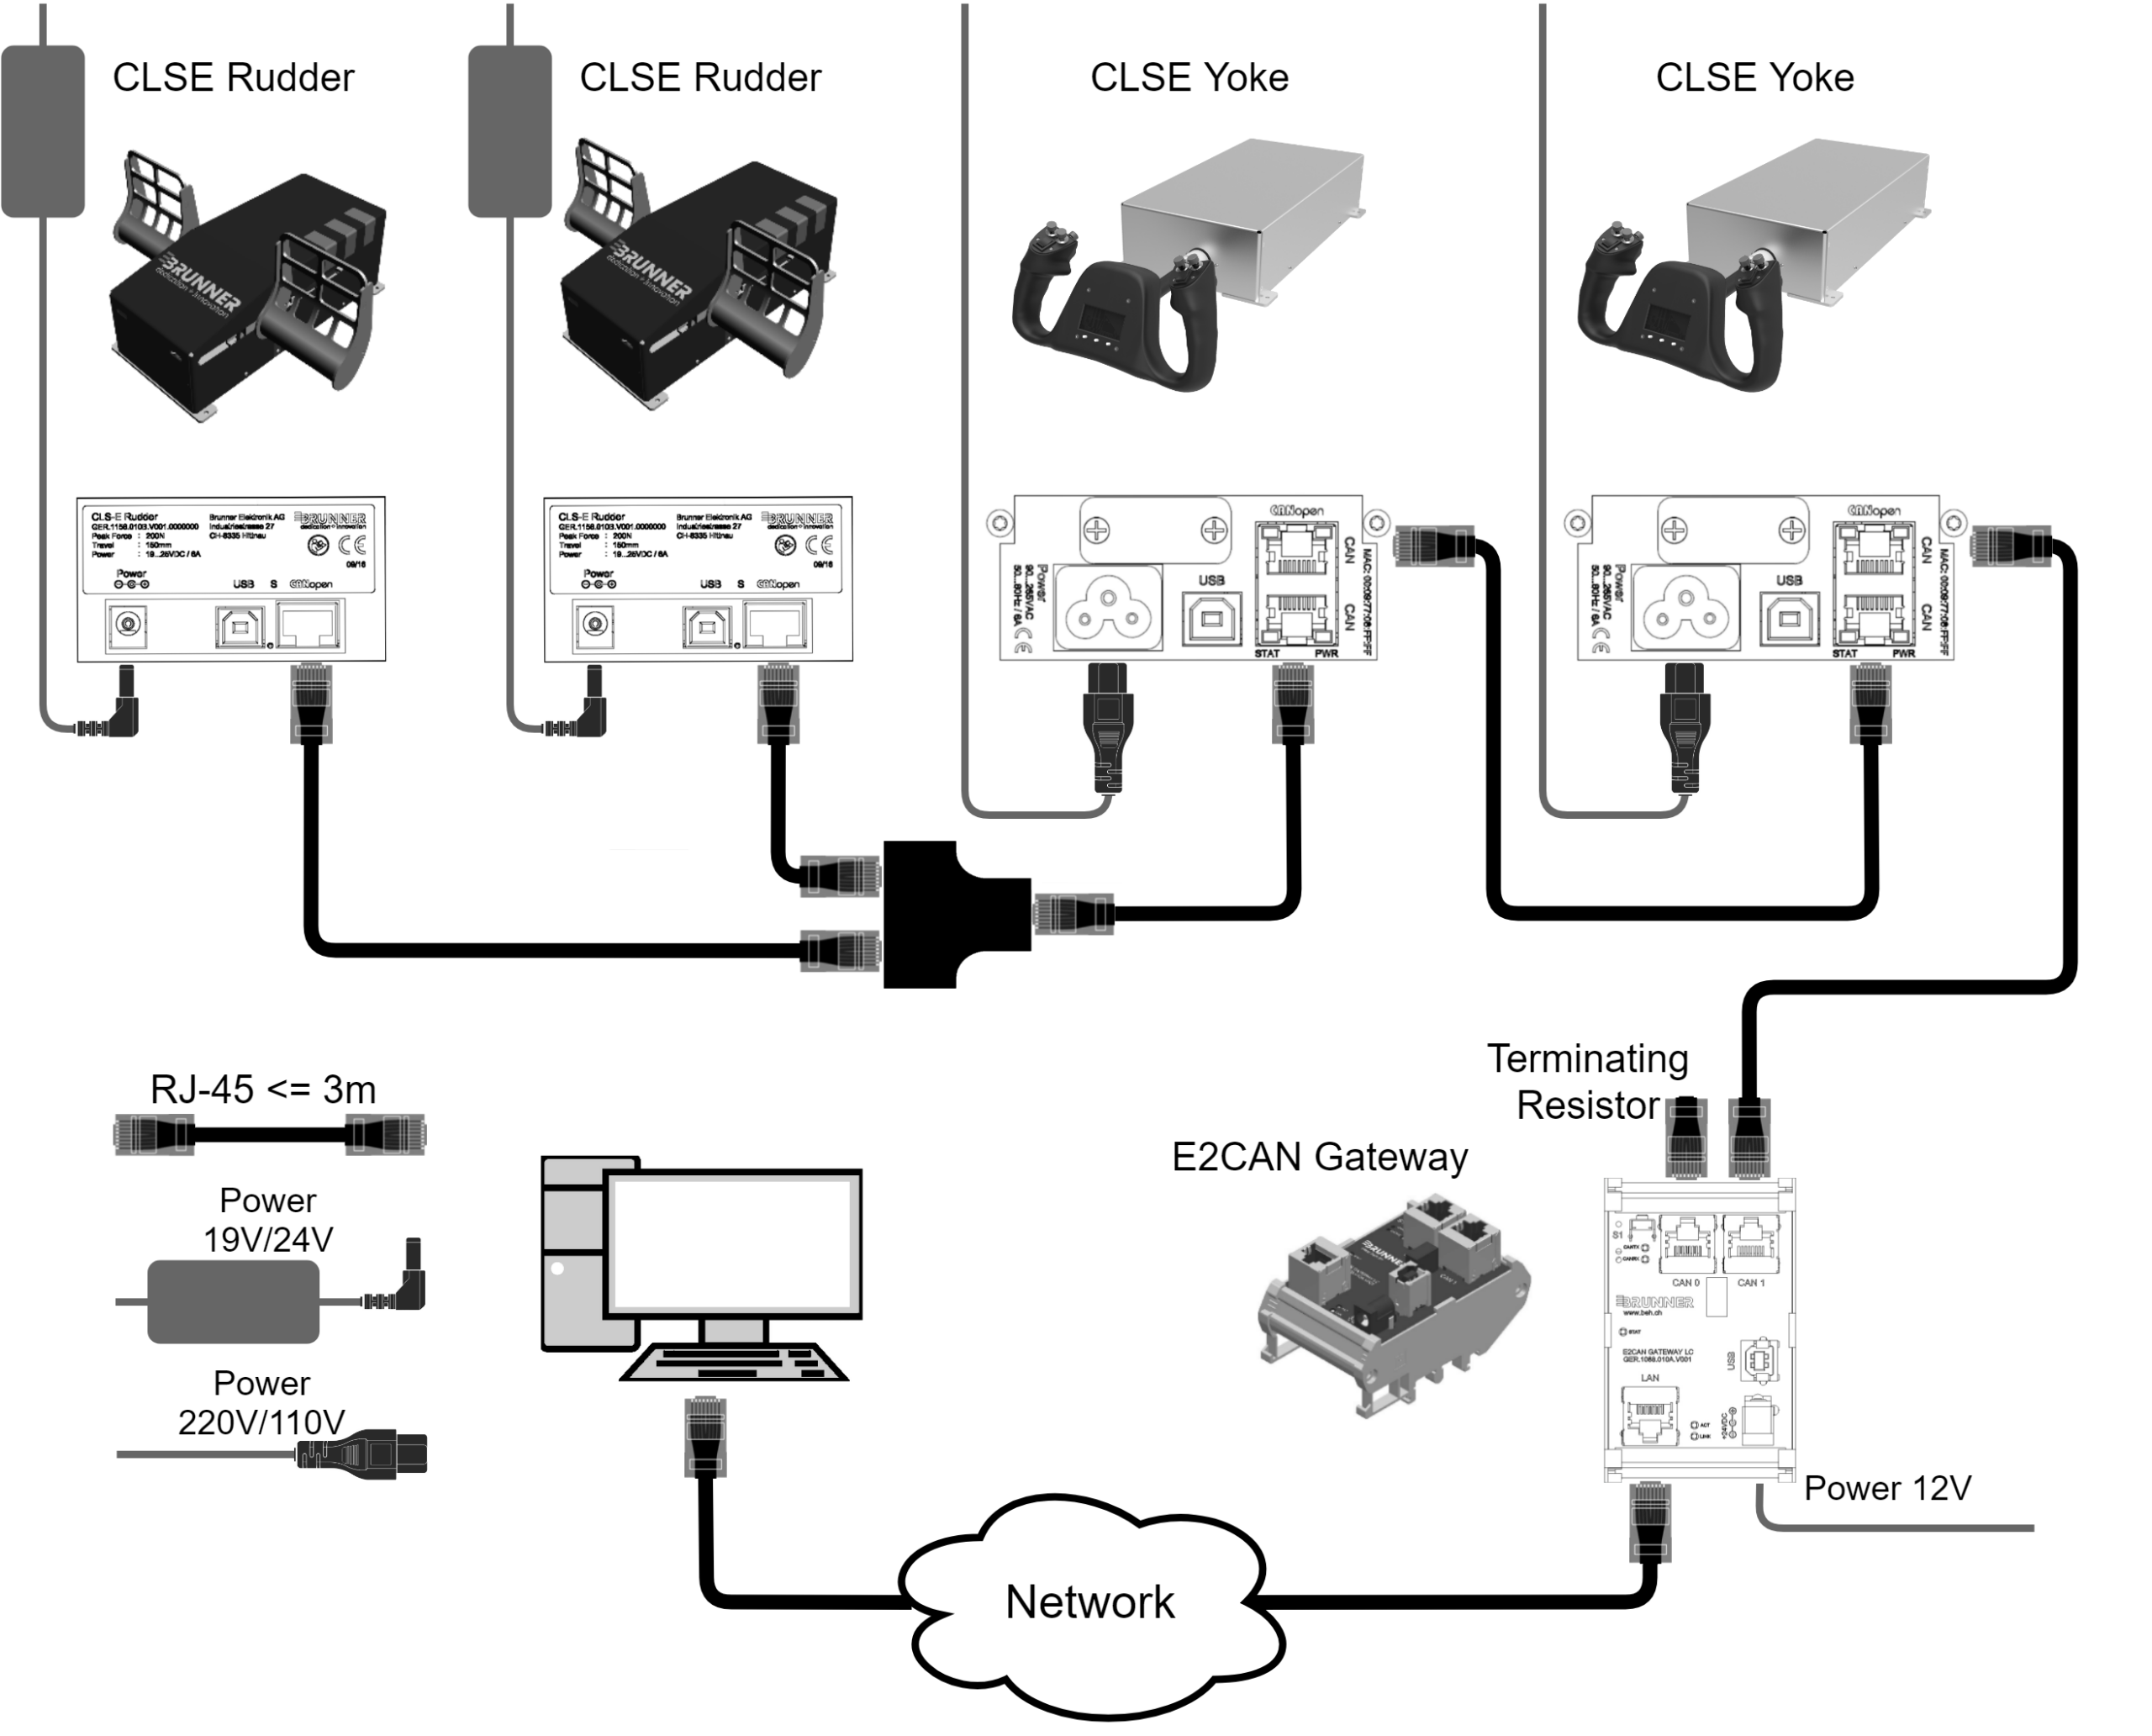
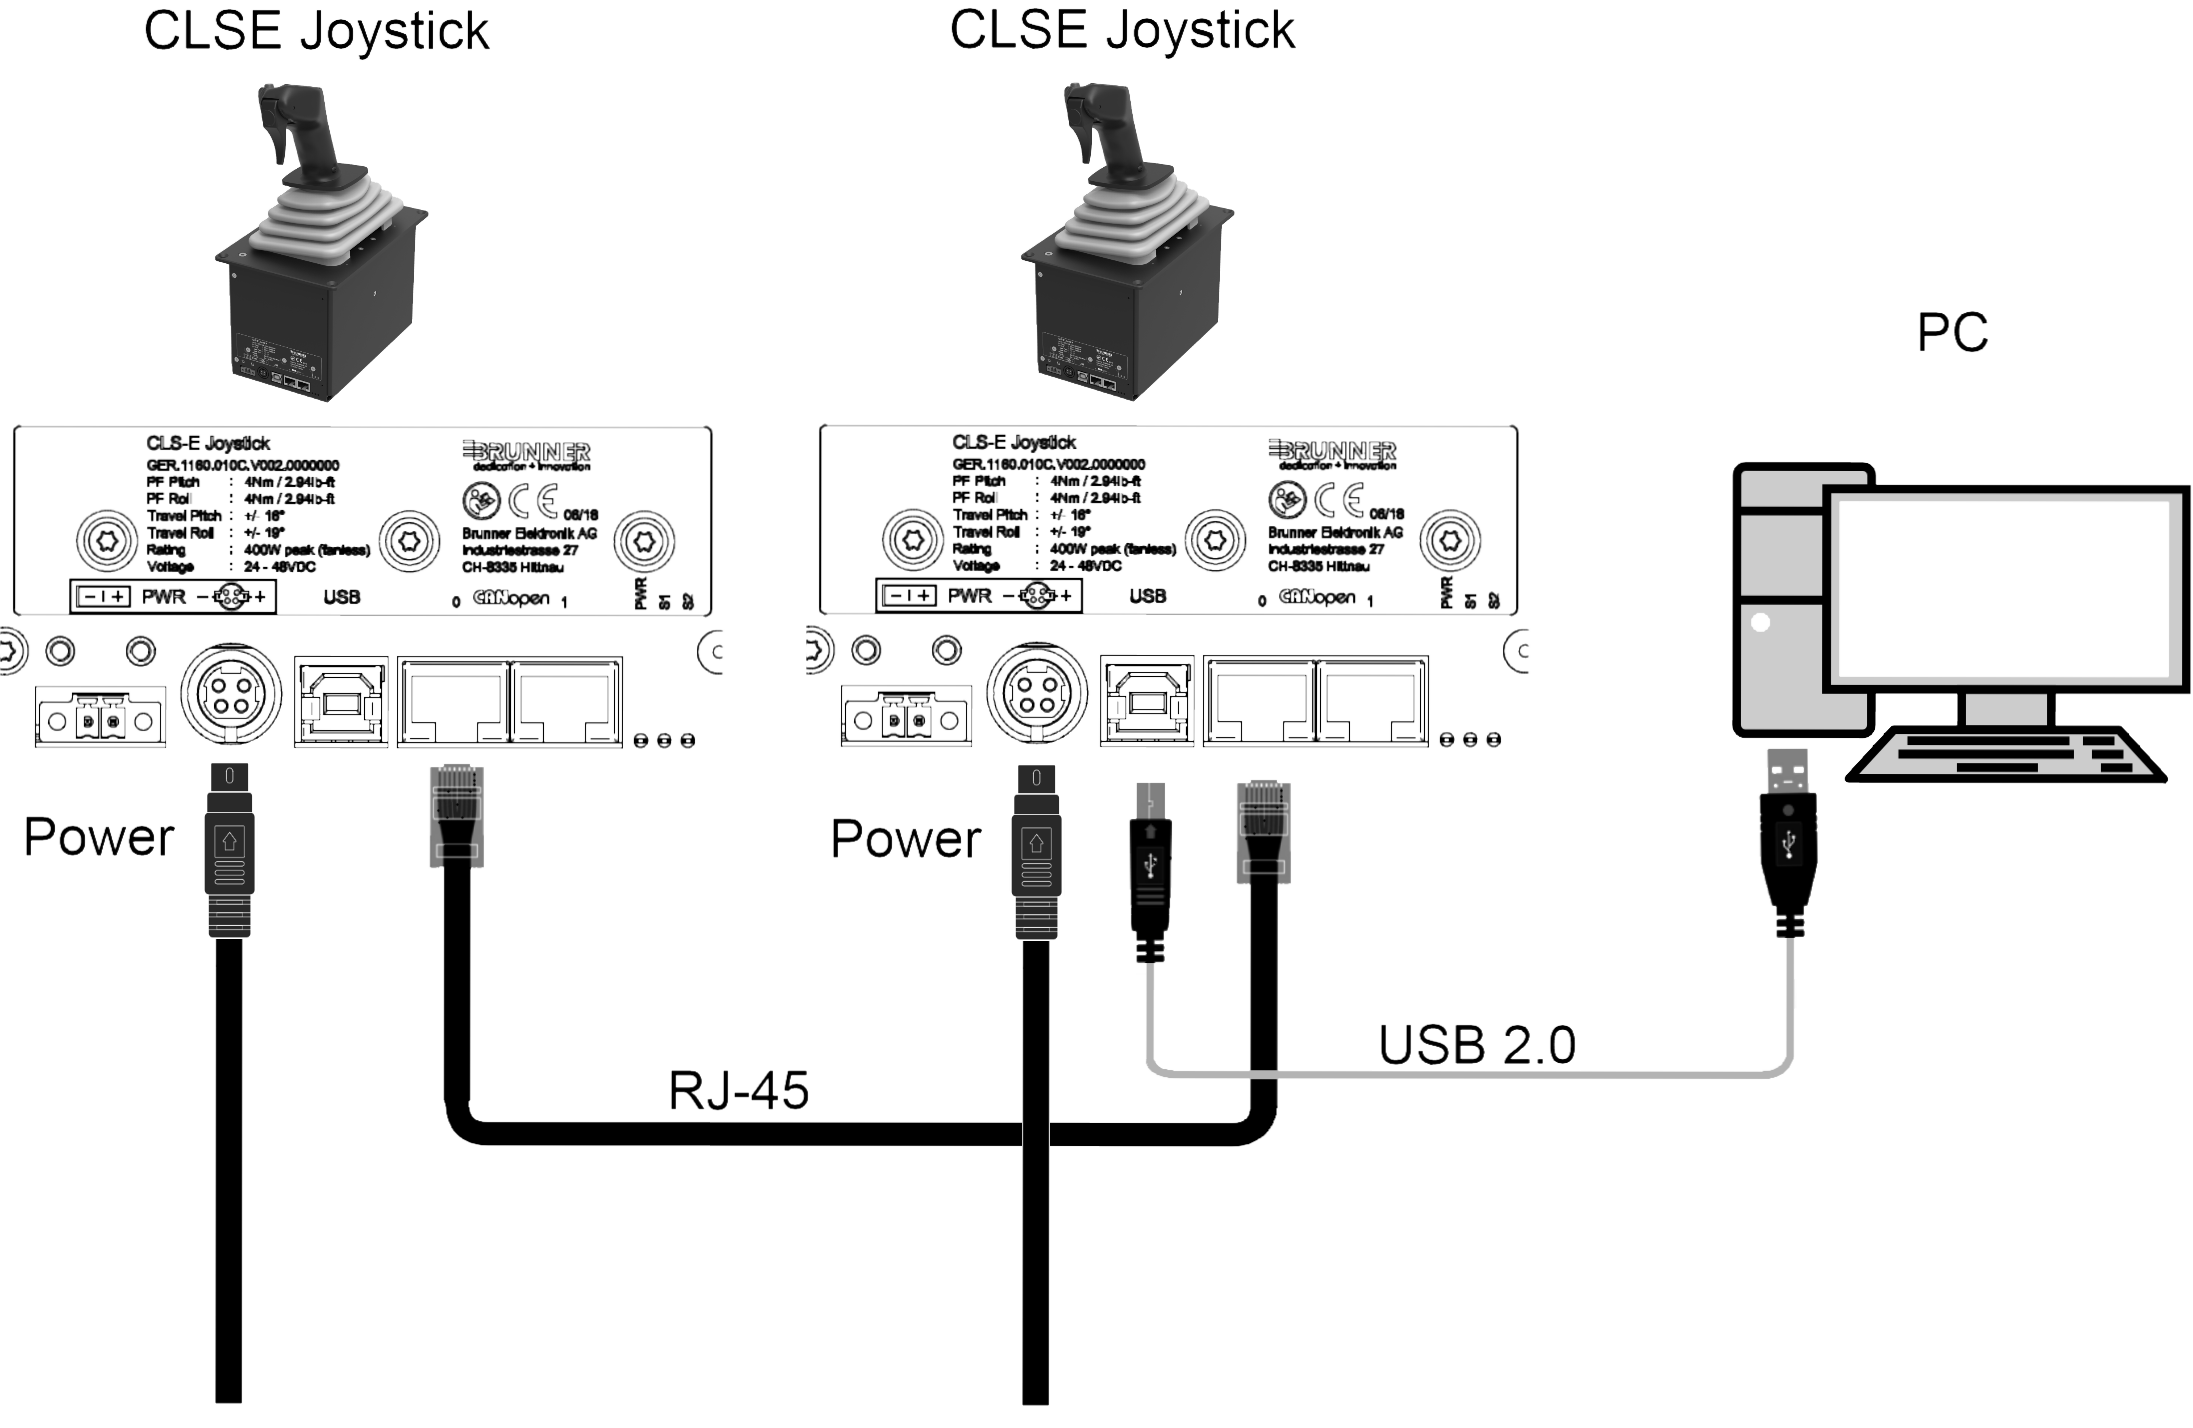
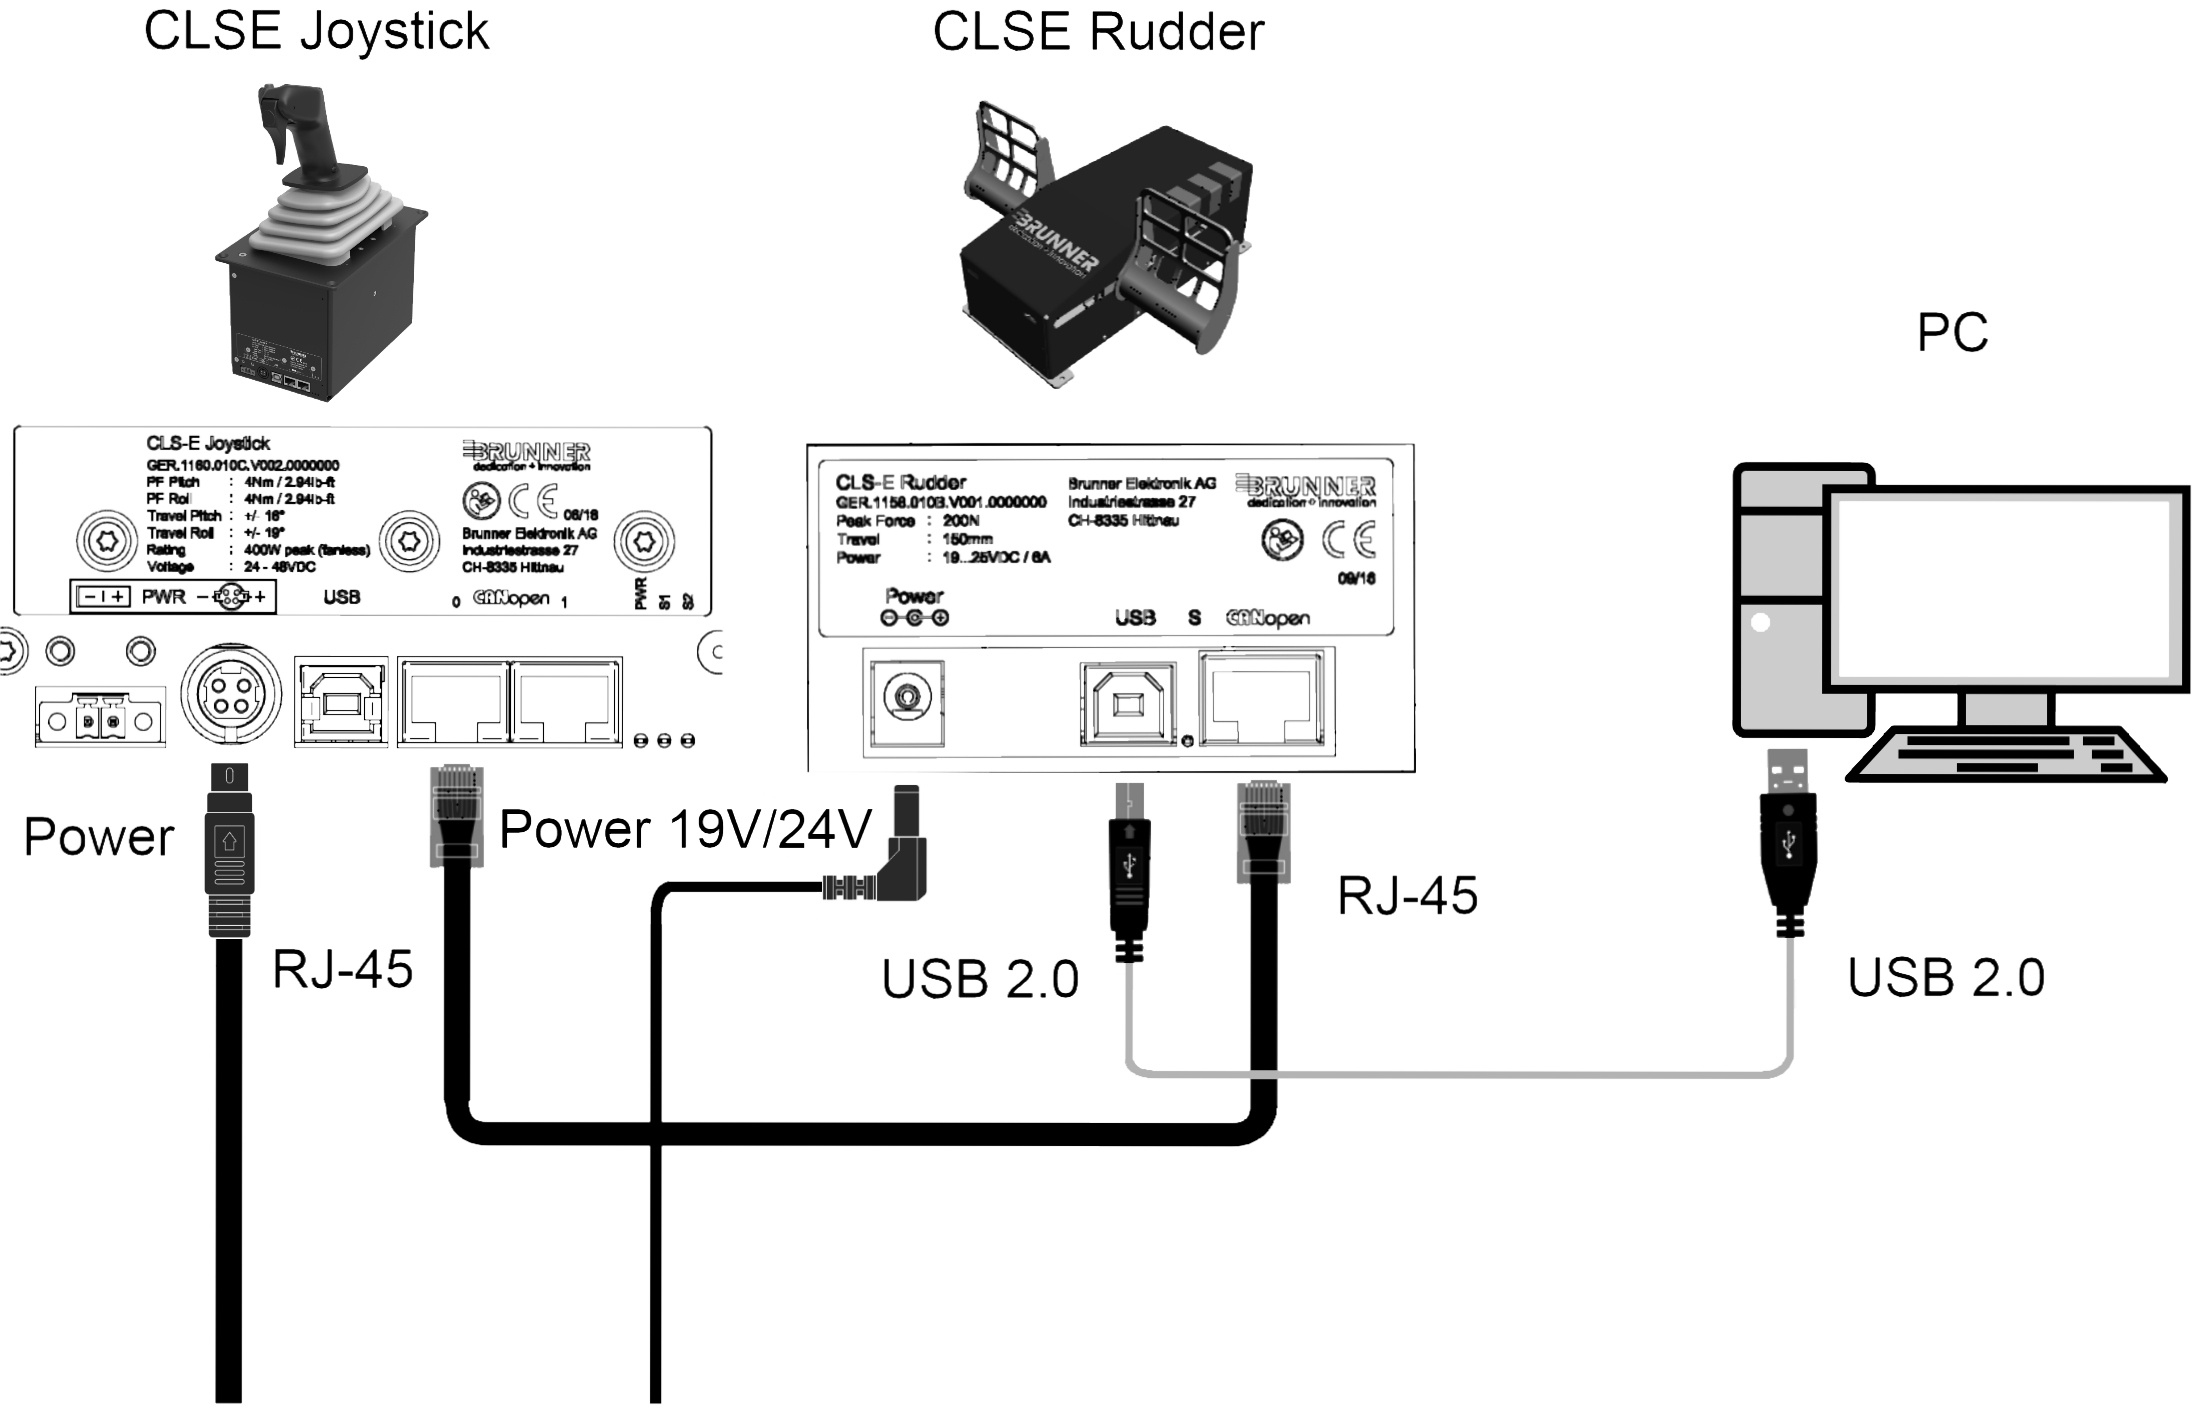
Did you wire your devices correctly? See the galery below for wiring instructions for you particular use case. If you only have one device, you may connected it to the computer with USB.

WARNING
Please be advised, the RJ45 sockets on our Brunner devices are for CAN bus.
They are not compatible with your normal LAN Ethernet network.
Do not connect your devices CAN ports to your normal network,
or you might damage or destroy your Brunner device!
Only our Brunner Gateways allow for Ethernet connections. You will need them if you want to connect more than 2 Brunner devices.


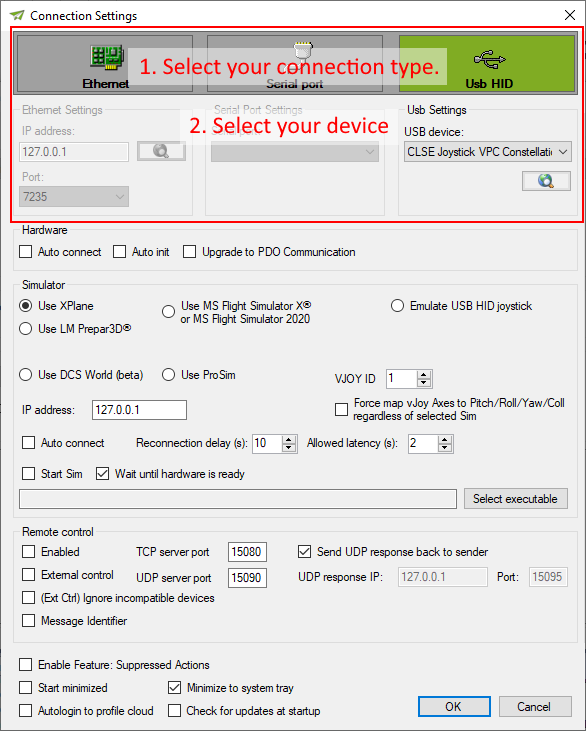
Did you configure CLS2Sim to connect to your first Brunner device via USB, or to your E2CAN Gateway via network?
- Do you have CLS2Sim installed?
You can download it from our website:
https://www.brunner-innovation.swiss/software-download-page/ - Do you have the CLS2Sim plugin for your specific supported simulation installed?
You can find the plugin installer here:
C:\Program Files (x86)\Brunner Elektronik AG\CLS2Sim\Simulator plugin installers - 3Did you choose the correct simulation in CLS2Sim settings?

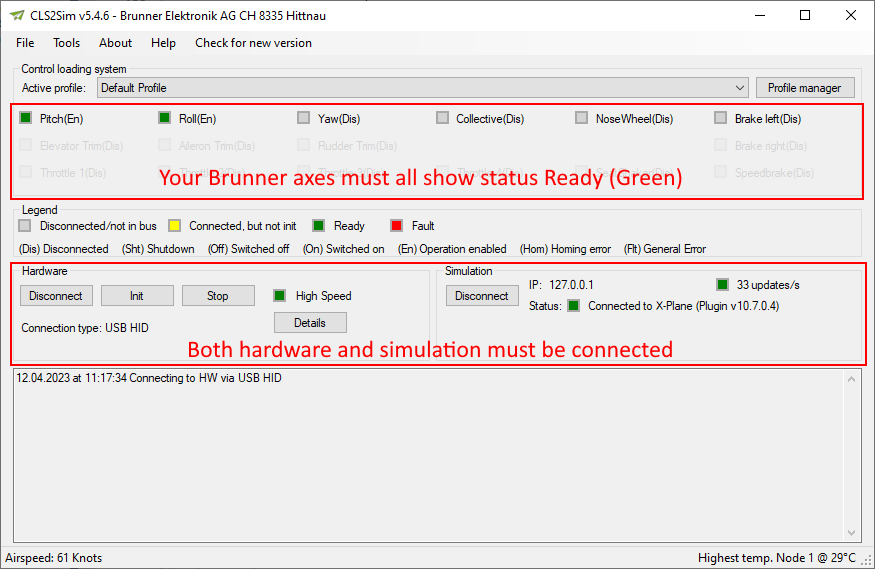
- Is CLS2Sim connected to both Hardware and Simulation? Are all you axes ready?


Most aircraft models for Simulators use some standard conventions for receiving input, as designed by the simulators themselves.
In X-Plane that would be the Dataref "sim/joystick/yoke_pitch_ratio"
Or in MSFS X / MSFS 2020 / P3D it would be the SimConnect variable "ELEVATOR POSITION"
But some aircraft models inject their own custom logic writing to these variables, competing with CLS2Sim for control.
To circumvent this problem, CLS2Sim offers the option to inject inputs by simulating a USB HID Gamepad using the third-party software vJoy.
Motorized axes supported vJoy
CLS2Sim can only route these specific axes to vJoy:
- Pitch/Elevator
- Roll/Aileron
- Yaw/Rudder
- Collective
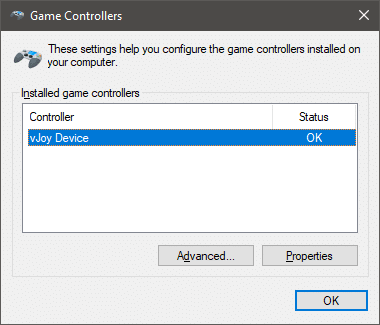
Installing vJoy
First, vJoy must be installed. Only the specific vJoy installer shipped with CLS2Sim can be used.
It can be found in the installation directory of CLS2Sim:
"C:\Program Files (x86)\Brunner Elektronik AG\CLS2Sim\Virtual joystick driver\vJoySetup.exe"
The installer may hang when installing the driver. Give it 2 minutes, then force close the installer.
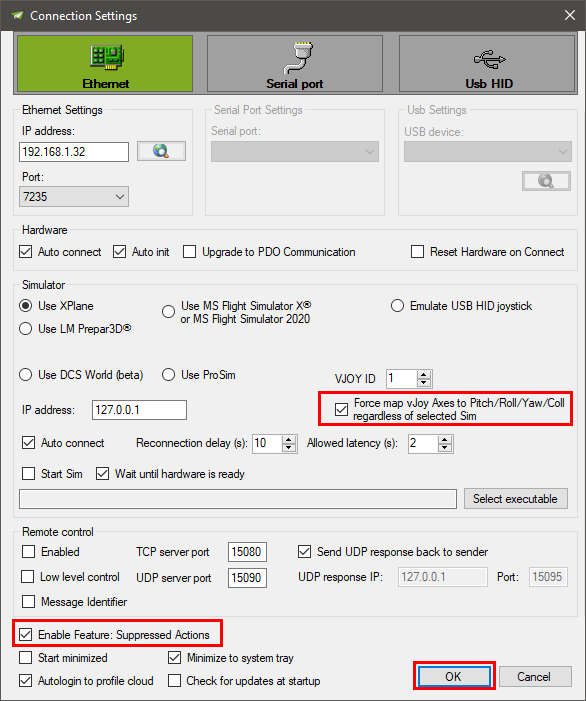
Enabling suppressed actions in CLS2Sim
After starting CLS2Sim, open the Settings dialog. You can only open it if your are DISCONNECTED from any hardware.

Now in the settings enable the feature "Suppressed Actions" as well as "Force map vJoy axes...".
Now after connecting CLS2SIm to your Brunner yokes/joysticks/rudders, go to the profile manager.
You will see a new entry "Suppressed Actions" in the "General" tab.
Open it up by clicking the configure button.
You are now presented with two lists.
Move any axis you want to suppress to the right side. In the example screenshot all available motorized axes have been suppressed.

Close the "Configure Suppressed Actions" dialog and click the OK button in the profile manager.
Close and restart CLS2Sim and do the same as well for your simulation software if it was running.
After starting CLS2Sim and connecting it to the hardware, it will now reroute the principal axes to vJoy.

You can now map these axes like any standard USB axis in your simulation.
X-Plane
"sim/joystick/yoke_pitch_ratio"
"sim/joystick/yoke_roll_ratio"
"sim/joystick/yoke_heading_ratio"
"sim/flightmodel2/misc/AoA_angle_degrees"
"sim/flightmodel/position/indicated_airspeed"
"sim/flightmodel/position/true_airspeed"
"sim/flightmodel/position/groundspeed"
"sim/cockpit/autopilot/autopilot_state"
"sim/cockpit2/controls/aileron_trim"
"sim/joystick/FC_roll"
"sim/cockpit2/controls/elevator_trim"
"sim/cockpit2/controls/rudder_trim"
"sim/joystick/servo_pitch_ratio"
"sim/joystick/servo_roll_ratio"
"sim/joystick/servo_heading_ratio"
"sim/cockpit2/autopilot/servos_on"
"sim/cockpit2/autopilot/autopilot_on"
"beh/autopilot_external_control"
"sim/flightmodel/forces/fnrml_gear"
"sim/joystick/joystick_pitch_sensitivity"
"sim/joystick/joystick_roll_sensitivity"
"sim/joystick/joystick_heading_sensitivity"
"sim/aircraft/engine/acf_num_engines"
"sim/flightmodel/engine/POINT_thrust"
"sim/aircraft/engine/acf_RSC_redline_eng"
"sim/flightmodel/forces/faxil_aero"
"sim/flightmodel/forces/fnrml_aero"
"sim/flightmodel/forces/fside_aero"
"sim/flightmodel/forces/g_axil"
"sim/flightmodel/forces/g_nrml"
"sim/flightmodel/forces/g_side"
"sim/flightmodel/position/beta"
"beh/external_forcescalefactor_active"
"beh/external_forcescalefactor_value"
"sim/flightmodel/position/true_theta"
"sim/flightmodel/position/true_phi"
"sim/flightmodel/position/mag_psi"
"sim/flightmodel/position/Q_dot"
"sim/flightmodel/position/P_dot"
"sim/flightmodel/position/R_dot"
"sim/flightmodel/position/Q"
"sim/flightmodel/position/P"
"sim/flightmodel/position/R"
"sim/cockpit2/gauges/indicators/altitude_ft_pilot"
"sim/cockpit2/gauges/indicators/vvi_fpm_pilot"
"sim/flightmodel/failures/onground_any"
"sim/cockpit2/annunciators/stall_warning"
"sim/cockpit2/annunciators/stall_warning_ratio"
"sim/time/local_time_sec"
"sim/weather/wind_now_y_msc"
"sim/weather/wind_now_x_msc"
"sim/weather/wind_now_z_msc"
"beh/custom_hydraulics_failure"
"beh/use_custom_hydraulics_failure"
"sim/aircraft/controls/acf_max_trim_elev"
"sim/aircraft/controls/acf_min_trim_elev"
"sim/flightmodel/position/q"
"sim/weather/barometer_sealevel_inhg"
"sim/weather/barometer_current_inhg"
"sim/flightmodel2/engines/prop_rotation_speed_rad_sec",
"laminar/B738/hydraulic/A_pressure"
"laminar/B738/hydraulic/B_pressure"
"sim/time/paused"
Prepar3D / MSFS X / MSFS 2020
"INCIDENCE ALPHA", "Radians"
"INCIDENCE BETA", "Radians"
"AIRSPEED INDICATED", "Knots"
"AIRSPEED TRUE", "Knots"
"GROUND VELOCITY", "Knots"
"AILERON LEFT DEFLECTION PCT", "percent over 100"
"ELEVATOR DEFLECTION PCT", "percent over 100"
"ELEVATOR TRIM PCT", "percent over 100"
"AILERON TRIM PCT", "percent over 100"
"RUDDER TRIM PCT", "percent over 100"
"AUTOPILOT MASTER", "Bool"
"STALL WARNING", "Bool"
"ROTOR GOV ACTIVE", "Bool"
"HYDRAULIC SYSTEM INTEGRITY", "percent over 100"
"NUMBER OF ENGINES", "Bool"
"PROP THRUST:1", "Pounds"
"PROP THRUST:2", "Pounds"
"PROP THRUST:3", "Pounds"
"PROP THRUST:4", "Pounds"
"PROP THRUST:5", "Pounds"
"PROP THRUST:6", "Pounds"
"PROP THRUST:7", "Pounds"
"PROP THRUST:8", "Pounds"
"TURB ENG JET THRUST:1", "Pounds"
"TURB ENG JET THRUST:2", "Pounds"
"TURB ENG JET THRUST:3", "Pounds"
"TURB ENG JET THRUST:4", "Pounds"
"TURB ENG JET THRUST:5", "Pounds"
"TURB ENG JET THRUST:6", "Pounds"
"TURB ENG JET THRUST:7", "Pounds"
"TURB ENG JET THRUST:8", "Pounds"
"GENERAL ENG PCT MAX RPM:1", "Percent"
"GENERAL ENG PCT MAX RPM:2", "Percent"
"GENERAL ENG PCT MAX RPM:3", "Percent"
"GENERAL ENG PCT MAX RPM:4", "Percent"
"SIM ON GROUND", "Bool"
"SURFACE TYPE", "Enum"
"CRASH SEQUENCE", "Enum"
"PLANE PITCH DEGREES", "Radians"
"PLANE BANK DEGREES", "Radians"
"PLANE ALTITUDE", "Feet"
"VELOCITY WORLD Y", "Feet per second"
"AIRCRAFT WIND X", "Knots"
"AIRCRAFT WIND Y", "Knots"
"AIRCRAFT WIND Z", "Knots"
"AMBIENT WIND VELOCITY", "Knots"
"ROTATION VELOCITY BODY X", "Feet per second"
"ROTATION VELOCITY BODY Z", "Feet per second"
"ROTATION VELOCITY BODY Y", "Feet per second"
"ACCELERATION BODY Y", "Feet per second squared"
"LOCAL TIME", "Seconds"
"HYDRAULIC SWITCH", "Bool"
"AUTOPILOT ALTITUDE LOCK", "Bool"
"AUTOPILOT APPROACH HOLD", "Bool"
"AUTOPILOT ATTITUDE HOLD", "Bool"
"AUTOPILOT BACKCOURSE HOLD", "Bool"
"AUTOPILOT FLIGHT DIRECTOR ACTIVE", "Bool"
"AUTOPILOT GLIDESLOPE HOLD", "Bool"
"AUTOPILOT HEADING LOCK", "Bool"
"AUTOPILOT MASTER", "Bool"
"AUTOPILOT NAV1 LOCK", "Bool"
"AUTOPILOT PITCH HOLD", "Bool"
"AUTOPILOT VERTICAL HOLD", "Bool"
"AUTOTHROTTLE ACTIVE", "Bool"
"AUTOPILOT THROTTLE ARM", "Bool"
"GENERAL ENG THROTTLE LEVER POSITION:1", "percent over 100"
"AUTOPILOT WING LEVELER", "Bool"
"PROP RPM:1", "Rpm"
"PROP RPM:2", "Rpm"
"PROP RPM:3", "Rpm"
"PROP RPM:4", "Rpm"
"PROP RPM:5", "Rpm"
"PROP RPM:6", "Rpm"
"PROP RPM:7", "Rpm"
"PROP RPM:8", "Rpm"
"AUTOTHROTTLE ACTIVE", "Bool"
X-Plane | Prepar3d | MS FS 2020 | FSX | DCS | ProSim and as well Direct X interface is supported.
Because only CLS2SIM offers the required interface from our hardware to common simulation software.